Creating a seamless workflow for syncing photos and videos to google photos without rooting the daily driver phone.
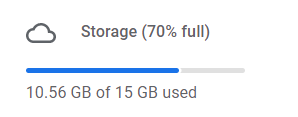
Let’s start with the problem statement. Google storage filling at a crazy speed and the result is gonna be nothing but just another monthly subscription.
Now many among us would be comfortable paying this little amount to prevent all the hassle you would have to go through. If you are one among them, here is a link where you can upgrade and solve the problem.
But for some of you, this subscription might not be the answer and probably the reason you are still here reading.
So let’s dive right into it and see what we can do here.
According to a Google Help Article
- Pixel devices from pixel 2 to pixel 5 can upload unlimited Storage saver quality pictures
- Pixel / Pixel XL can upload unlimited Original photos
Let’s try to use the above and create a seamless workflow that syncs pictures from our phones to google photos.
NOTE: There are tools available to use the above loophole to sync media to google photos but these require either rooting the phone or installing a custom ROM to device. This doesn’t seem like a very nice option to many and none of these works on iOS.
Before diving into the process, let’s define the outcome we want to achieve with this.
End Workflow Requirements
- No Root
- Automatic backup from phone
- Photos don’t contribute to google storage
- Fully automated solution i.e. minimum to no manual intervention required.
Now to use the above feature we either need a pixel phone or we need to spoof our device’s build.prop information like BRAND, MANUFACTURER, MODEL, FINGERPRINT of some Pixel device.
Now doing this requires root access to the device; not many would want to do that with our daily driver phones.
So what different options do we have?
- Maybe having a secondary android phone accessible?
- Can I also use an emulator, please?
- I don’t know, you tell me in the comments
And absolutely, both 1. and 2. can work pretty well here and for the sake of this article, we are gonna go ahead with 2. given not everybody will have a secondary device accessible.
Let’s start with setting up an android virtual device (AVD) on our system.
1. Setting up Android Emulator / Android Virtual Device a.k.a. AVD
Android Emulator comes bundled with Android Studio but given we are not going to build any application here so we don’t need Android Studio, we just need to setup Android Emulator. While Setting up an Emulator is task in itself and not all of you would familiar with the process on how to do it so keeping this in mind, I wrote another article explaining the whole process of setting up an Emulator in detail i.e. Setting up Android Emulator without Android Studio
NOTE: For this specific setup we would need an emulator with Google APIs
included. So if you are familiar with the process of setting up an AVD go ahead and set up an AVD. And if you are not, use the above article to set up one, and then we can continue from here.
For the sake of this tutorial, I would be using the following
Name: photos-runner
System Image: system-images;android-30;google_apis_playstore;arm64-v8a
2. Setting up unlimited backup on AVD
If you have followed so far, you would have a working emulator. Now to set up unlimited backup via google photos we have to spoof this virtual device as a pixel.
The process would involve the following steps
- Getting root access to the virtual device
- Installing Xposed Framework
- Spoof virtual device as pixel
Let’s get started and root the phone first. To do that we will be using rootAVD.
First, open a terminal window and run the following commands
If the above process is successful you will see your AVD restart with a new application already installed called Magisk.
Note: It might happen that the AVD doesn’t boot up automatically.
If that happens, you can manually cold boot the AVD with
emulator @photos-runner -netdelay none -netspeed full -no-snapshot-load
Go ahead and open the Magisk app. It would ask to do some additional setup. i. Just cancel the reboot dialog
ii. Go into the settings by clicking the top right icon
iii. In the Magisk section, enable the ZYGISK
iv. Now restart the Magisk app and click OK to reboot the AVD.
With this, we have successfully got the root access to this AVD 🙌
Now, let’s get on with installing Xposed Framework in our AVD. We would be doing this with LSPosed
i. Download LSPosed in the AVD using chrome or run the following command in the terminal.
ii. Open Magisk, and go to the modules tab in the bottom right
iii. Click on Install from storage.
iii. Select the downloaded zip file of LSPosed
iv. Once the installation is done, click Reboot in the bottom right corner.
Once the AVD restarts you will get an option to add a shortcut to the home screen, here press OK to the dialog.
With this, we have Xposed installed on our AVD 🤞
Now the last step here, i.e. spoof the device as Pixel. And to do this we will use
Pixelify Google Photos
i. We need to download pixelify-gphotos.apk | Release Page
ii. Make sure APK is downloaded in the same folder in which you have your terminal open, then run the following command
This will install a new app in our AVD. But this app is not yet active and to make it active we need to do the following steps
i. Open the LSPosed Shortcut on the home screen
ii. Go to the modules tab (second icon in the bottom left corner)
iii. Click on the module Pixelify GPhotos.
iv. Turn on the toggle with Enable module.
v. Finally click on the Reboot notification
Now open the Pixelify GPhotos app and set the following configuration
i. Device: Pixel XL
ii. Override ROM feature levels: ON
iii. Make sure to spoof only in google photos: OFF
And then finally click on Force Stop Google Photos and grant the superuser access to the Pixelify app.
And voila! We have successfully spoofed our emulator as a pixel device.
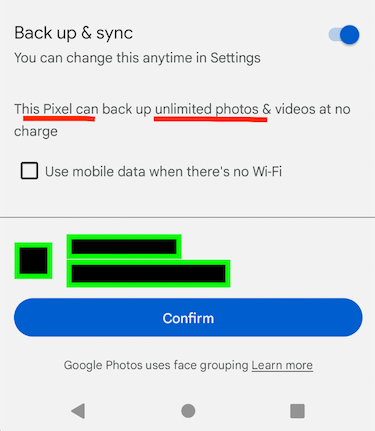
To confirm in the Google Photos app in the backup and sync section you will see that you can upload unlimited photos and videos at no charge 🙌 🎉
3. Syncing photos between actual device and AVD
Now that we can finally upload pictures to google photos without them contributing to Google Storage but the only issue is that this can only be done via this Emulator.
To solve this problem we will be using Resilio Sync. It’s P2P syncing software that will sync all our media from our actual device to AVD.
It’s available on iOS and Android and thus will work best for our use case 🙌
You need to install Resilio Sync on your actual device and once you are done, we need to set up the backup folder.
On iOS
i. Click on the top right + icon, and select Camera Backup
ii. Make sure you give access to all your photos
iii. Copy the backup link
On Android (Including some optional steps that make the process even better)
i. Click on the + icon at the bottom right and select Create Folder
ii. Give a suitable name to this folder (something like Camera Backup)
iii. Choose a folder that you would want to backup to google photos (For me this folder is the DCIM folder)
iv. And then click on Create
v. Go back, click on the info icon of your backup folder, turn off Selective Sync, and copy the link.
vi. [Optional] Change the setting from ‘Read Only’ to ‘Read and Write’
Once you are done with setting sync on your actual device you will end up with a link. This link will connect your actual device with Resilio sync on AVD
Now using the play store in your emulator install Resilio Sync in your AVD and once you are done
i. Click on the + icon on the bottom right
ii. Select the last option of ‘Enter a key or link’
iii. Paste the link you got from your actual device
iv. Accept the sync request in your actual device in the Resilio sync app
v. Once accepted, in AVD go into the info section of the backup folder
vi. Unselect Selective Sync option
That’s it! With this, all your phone's pictures will get synced to your AVD automatically.
You should get a prompt to back up this folder to Google Photos. If you didn’t get the prompt, you can go to the setting of google photos and backup the sync folder.
With this, all the pictures and videos in the backup folder of your actual device would get synced to Google Photos automatically.
Enable Automatic Deletion of media from AVD [Optional]
i. Go in Settings > Storage > Enable Storage Manage
ii. Click on Storage Manager, and set the frequency at which you want to delete your media from your AVD
Note 1. This will only remove the media which is already backed up to google photos from AVD.
Note 2. On iOS, Even though these photos might get deleted from AVD, these will still exist on iPhone. Though in google photos you will see if those photos have already been backed up on not. There is also an option in the setting that will help you clear space on your iPhone by deleting already backed-up media.
Note 3. On Android, if you have followed the optional steps, once the photos get deleted from your AVD these photos will also get deleted from your actual device and thus clearing up space automatically
Congratulations 🎉
If you have followed me so far, we have been able to set up unlimited backup to google photos. I have tried to mention all the steps in detail but in case you face any issues along the way do let me know in the comments, I would be happy to assist.
If you have some suggestions or feedback drop them in the comments as well. You can also tweet me at @_jaikathuria
I personally have been using this process to back up all my photos from my android phone. I don’t keep this virtual device on all the time rather run it for an hour every day using an automated script just to sync all the photos. And the process has been working like a charm ⭐️.
I really hope this would help some of you.
NOTE: This article is written as a learning initiative and for educational purposes only. The author cannot be held liable for any damages to the device/data or in any legal scenario.